Introduction
The Vehicle Service Management System is a modern web-based application designed to simplify and automate the daily operations of vehicle service centers such as car wash businesses, garages, and maintenance workshops.
The system provides a complete solution for managing customers, vehicles, services, appointments, expenses, and payments in one centralized platform.
Technologies Used
This system was built using the following technologies and tools:
Requirements
Server Side
- PHP Version: 7.4 or higher (Recommended 8.0+)
- MySQL Version: 5.7+ or MariaDB 10+
- XAMPP / WAMP Server
Web Browsers
- Google Chrome (Recommended)
- Mozilla Firefox
- Microsoft Edge
- Opera
Features
- Customer Management
- Vehicle Management
- Service Management
- Appointment Booking
- Receipt Management
- Customer Balance Tracking
- Expense Management
- Automatic Queue Generation
Installation Guide
Thank you for purchasing the Vehicle Service Management System. This guide will help you install and run the system on both Local Server (Offline) and Live Server (Hosting).
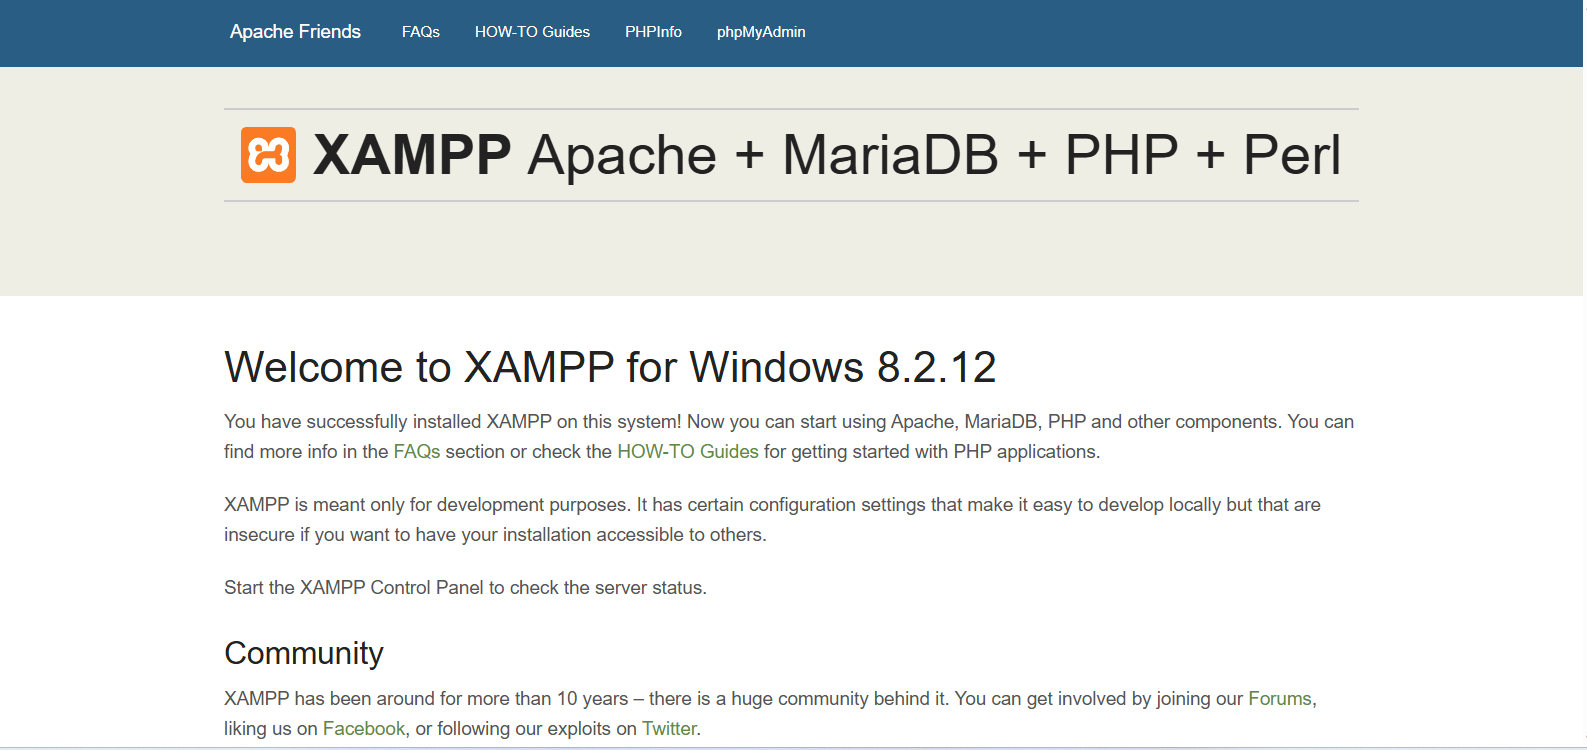
IMPORTANT: Install & Start Local Server (XAMPP)
Before starting the installation, you must install and run a local server (XAMPP, WAMP, or Laragon).
1. Install XAMPP
- Download XAMPP from: Download Xampp here
- Install it on your computer.
- During installation, make sure you select: Apache, MySQL, PHP, and phpMyAdmin.
2. Open XAMPP Control Panel
After installation, open the XAMPP Control Panel. Click Start for Apache and MySQL. Both must show Green (Running) status.

⚠️ Note: If Apache or MySQL is not running, the system will NOT work. To confirm, go to: http://localhost
1. Local Server Installation (Offline)
Download the ZIP file from CodeCanyon, extract it, and copy the folder to:
XAMPP: C:\xampp\htdocs\ | WAMP: C:\wamp\www\
Go to localhost/phpmyadmin, create a new database (e.g.,
vehicle_db). Go to Import tab, select the .sql file
from the "Database" folder, and click Go.
Navigate to V1.0.0-Vechile-Service/includes/conn.php and update: Database Name, Username
(root), and Password (empty).
Type: localhost/V1.0.0-Vechile-Service in your browser.
Username: admin | Password: admin@123456
2. Live Server Installation (Online)
Follow the steps below to install the system on your live hosting server (cPanel).
Go to https://yourdomain.com/cpanel and enter your
hosting credentials (Username & Password).
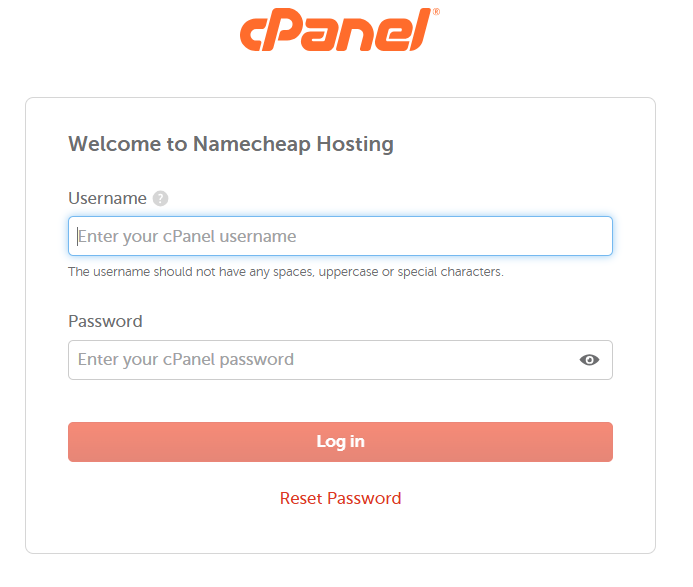
In the cPanel dashboard, you will primarily use: File Manager, MySQL Databases, and phpMyAdmin.
- Open File Manager ->
public_html/. - Click Upload and select your project ZIP file.
- Once 100% completed, right-click the ZIP and select Extract.
- Move all files inside the folder directly to
public_html/.
- Create a database (e.g.,
vehicle_db) in MySQL Databases. - Create a User (e.g.,
vehicle_user) with a strong password. - Add User to Database: Select ALL PRIVILEGES and click Make Changes.
- Open phpMyAdmin, select the database, and Import the
.sqlfile.
Open /includes/conn.php, right-click and Edit:
                $host = "localhost";

                $user = "your_db_user";

                $pass = "your_db_password";

                $db   = "your_db_name";
Go to https://yourdomain.com.
Login Details: Username: admin | Password: admin@123
Common Error:
If you see "Database Connection Failed": Check your
username, password, database name in conn.php and ensure the user has ALL
PRIVILEGES.
Important Notes:
- Host is usually "localhost".
- Ensure
index.phpis insidepublic_html/.
How To Use System
1. Customer Management
Managing your customers is easy. You can register new customers and manage their information through the Registration menu.
Adding a New Customer
Path: Registration -> Manage Customers
To add a new customer, click the "Add New Customer" button. A modal window will appear where you need to enter:
- Customer ID: Automatically generated.
- Customer Name: Full name of the customer.
- Customer Phone: Active phone number for contact.
- Address: Residential or business location.
Once entered, click the Save button to add the record to the system.
NB: How to Update & Delete
When you want to Update or Delete a record, you can do it directly from the Manage Customers table using the Action column:
Editing a Customer:
Clicking Edit will open a modal pre-filled with the current data. After making changes, click Save Changes to update.
Deleting a Customer:
Clicking Delete will show a confirmation alert:
Are you sure to
delete?
Click OK to remove permanently, or Cancel to
keep the data.

2. Manage Services
This section allows you to define the services you offer and set prices based on vehicle categories.
Adding a New Service
Path: Registration -> Manage Services
To add a new service, click the "Add New Service" button. A modal window will appear where you need to enter:
- Choose Vehicle Type: Select the category (e.g., Car, SUV, Truck).
- Service Name: Enter the service name (e.g., Full Wash).
- Price: Set the cost for this specific vehicle type.
Click Save to add the service to your list.
NB: How to Update & Delete
When you want to Update or Delete a record, you can do it directly from the Manage Service table using the Action column:
Editing a Service:
Clicking Edit will open a modal pre-filled with the current data. After making changes, click Save Changes to update.
Deleting a service
Clicking Delete will show a confirmation
alert:
Are you sure
to delete?
Click OK to remove permanently, or Cancel
to keep the data.

3. Vehicles Type
This section allows you to define the services you offer and set prices based on vehicle categories.
Adding A New Vehicles Type
Path: Registration -> Manage Vehicles Type
To add a new vehicles type, click the "Add New Vehicles Type" button. A modal window will appear where you need to enter:
- Vehicles Type Name: Enter Vehicles Type Name (e.g., Car, SUV, Truck).
Click Save to add the service to your list.
NB: How to Update & Delete
When you want to Update or Delete a record, you can do it directly from the Manage Vehicles Type table using the Action column:
Editing A Vehicles Type:
Clicking Edit will open a modal pre-filled with the current data. After making changes, click Save Changes to update.
Deleting A Vehicles Type
Clicking Delete will show a confirmation
alert:
Are you sure
to delete?
Click OK to remove permanently, or Cancel
to keep the data.

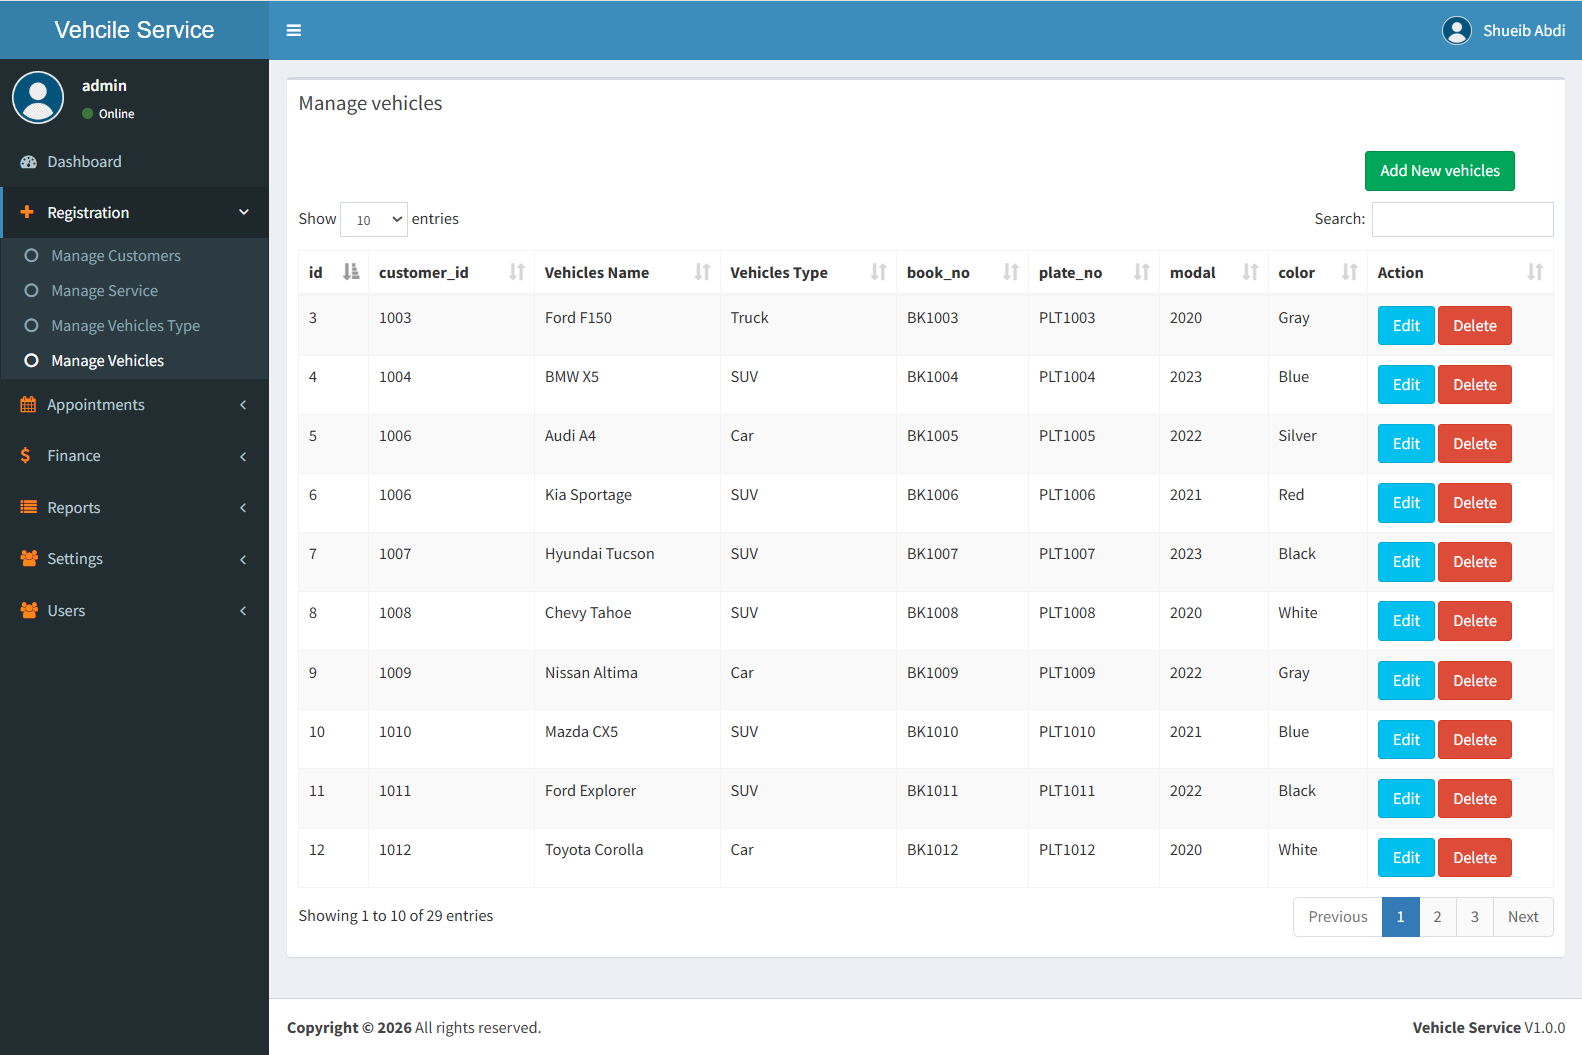
4. Manage Vehicles
This section allows you to define the services you offer and set prices based on vehicle categories.
Adding A New Vehicles
Path: Registration -> Manage Vehicles
To add a new Manage Vehicles, click the "Add New Vehicles" button. A modal window will appear where you need to enter:
- Choose Cutomer: Select the Customer.
- Vehicles Name: Enter the Vehicles name (e.g.,Toyota Corolla, BMW X5,Toyota Hilux,Toyota Corolla).
- Choose Vehicles Type: Enter Vehicles Type Name (e.g., Car, SUV, Truck).
- Book Number: Enter The Car Book Number.
- Plate Number: Enter The Car Plate Number.
- Modal: Enter The Car Modal.
- Color: Enter The Car Color.
Click Save to add the Manage Vehicles to your list.
NB: How to Update & Delete
When you want to Update or Delete a record, you can do it directly from the Manage Vehicles table using the Action column:
Editing A Vehicles:
Clicking Edit will open a modal pre-filled with the current data. After making changes, click Save Changes to update.
Deleting A Vehicles
Clicking Delete will show a confirmation
alert:
Are you sure
to delete?
Click OK to remove permanently, or Cancel
to keep the data.
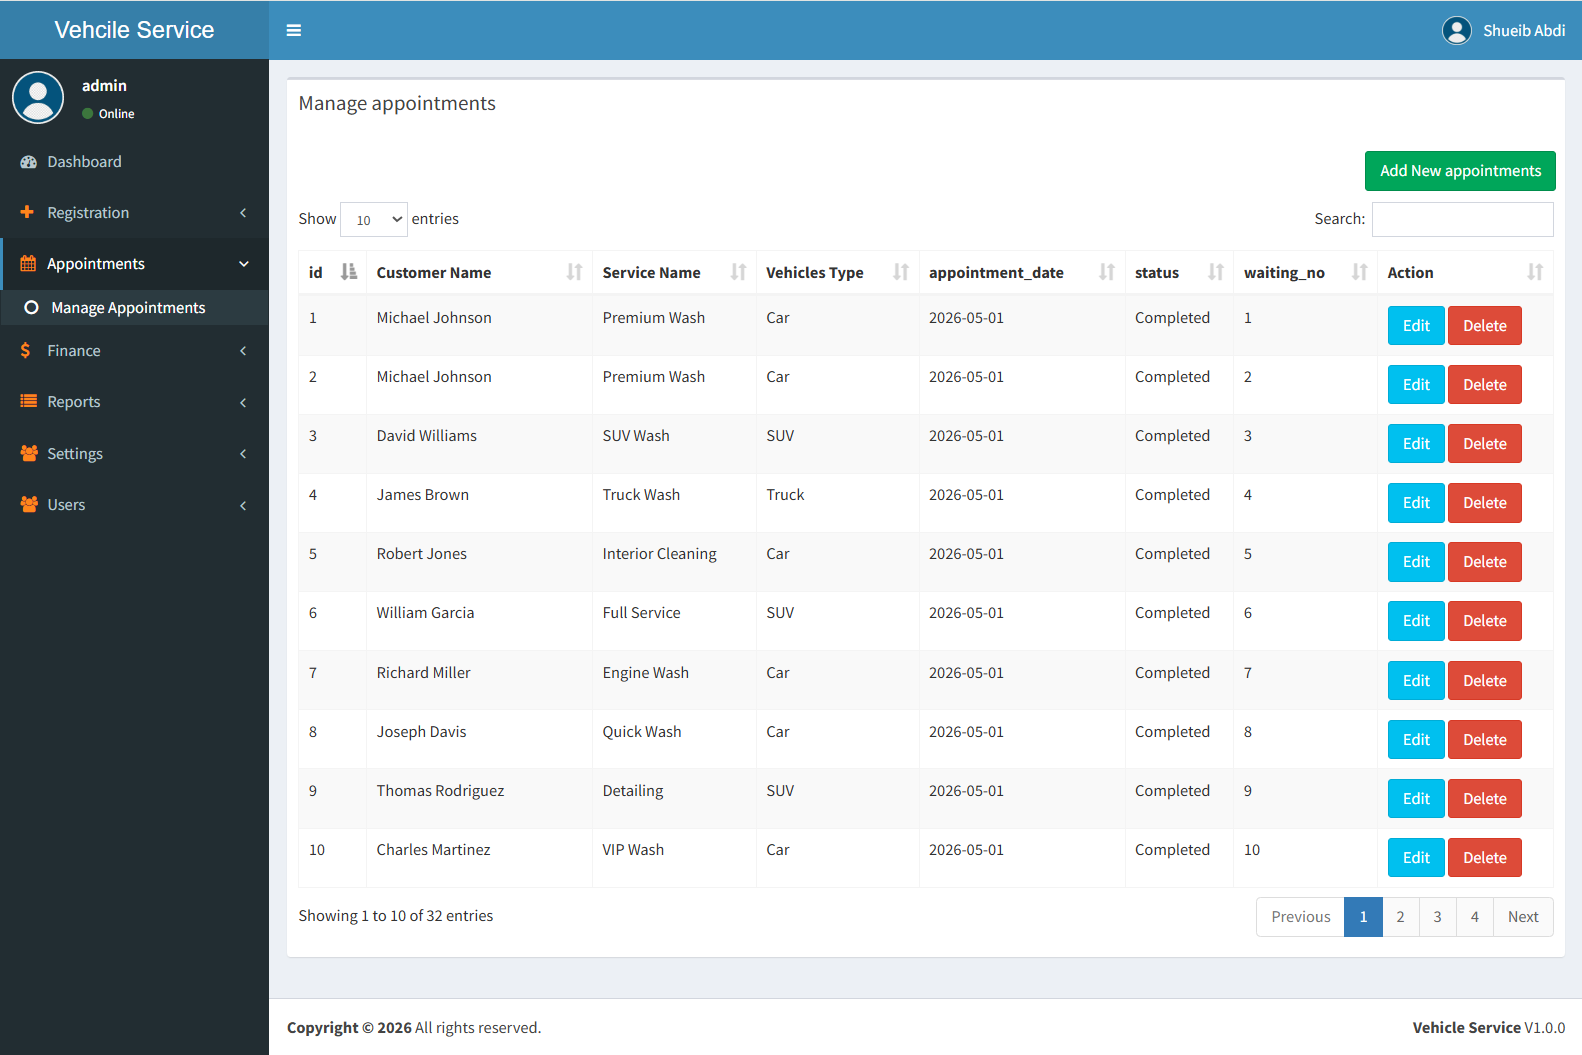
5. Manage Appointments
This section allows you to define the services you offer and set prices based on vehicle categories.
Make A New Appointment
Path: Registration -> Manage Appointments
To make a new Appointment, click the "Add New appointments" button. A modal window will appear where you need to enter:
- Choose Cutomer: Select the Customer.
- Choose Service: Enter the service name (e.g., Basic Wash,Premium Wash,Bike Wash) when you select service you will se the input read only that show service price.
- Choose Vehicles Type: Enter Vehicles Type Name (e.g., Car, SUV, Truck).
- Select Date: The Date of appointment.
Click Save to add the Manage Appointments to your list.
NB: How to Update & Delete
When you want to Update or Delete a record, you can do it directly from the Manage Appointments table using the Action column:
Editing Appointments:
Clicking Edit will open a modal pre-filled with the current data. After making changes, click Save Changes to update.
Deleting Appointments
Clicking Delete will show a confirmation
alert:
Are you sure
to delete?
Click OK to remove permanently, or Cancel
to keep the data.
6. Manage Receipts
This section allows you to manage customer payments and track all received amounts. It helps you handle outstanding balances and maintain accurate financial records.
Add New Receipt
Path: Finance -> Manage Receipts
To register a new payment, click the "Add New Receipt" button. A modal window will appear where you need to enter:
- Select Customer: Choose the customer who is making the payment.
- Available Amount: This field is automatically filled when you select a customer. It shows the total unpaid balance and is read-only.
- Paid Amount: Enter the amount being paid.
- Discount: Enter any discount if applicable.
- Resto: This will calculate the remaining balance after payment.
- Select Account: Choose the account where the payment will be recorded.
- Payment Method: Select payment type (e.g., Cash, Mobile Money, Bank).
- Payment Date: Choose the date of payment.
Click Save to record the payment successfully.
NB: How to Update & Delete
When you want to Update or Delete a receipt, you can do it directly from the Manage Receipts table using the Action column:
Editing Receipts:
Clicking Edit will open a modal pre-filled with the current receipt data. After making changes, click Save Changes.
Deleting Receipts
Clicking Delete will show a confirmation alert:
Are you sure to delete?
Click OK to remove permanently,
or Cancel to keep the data.

7. Manage Accounts
This section allows you to manage financial accounts where all transactions such as receipts and expenses are recorded. Examples include Cash, Bank, or Mobile Money accounts.
Add New Account
Path: Finance -> Manage Accounts
To create a new account, click the "Add New Account" button. A modal window will appear where you need to enter:
- Account Name: Enter the name of the account (e.g., Cash, Bank, EVC Plus).
Click Save to add the account to your system.
NB: How to Update & Delete
When you want to Update or Delete an account, you can do it directly from the Manage Accounts table using the Action column:
Editing Accounts:
Clicking Edit will open a modal pre-filled with the current account name. After making changes, click Save Changes.
Deleting Accounts
Clicking Delete will show a confirmation alert:
Are you sure to delete?
Click OK to remove permanently,
or Cancel to keep the data.

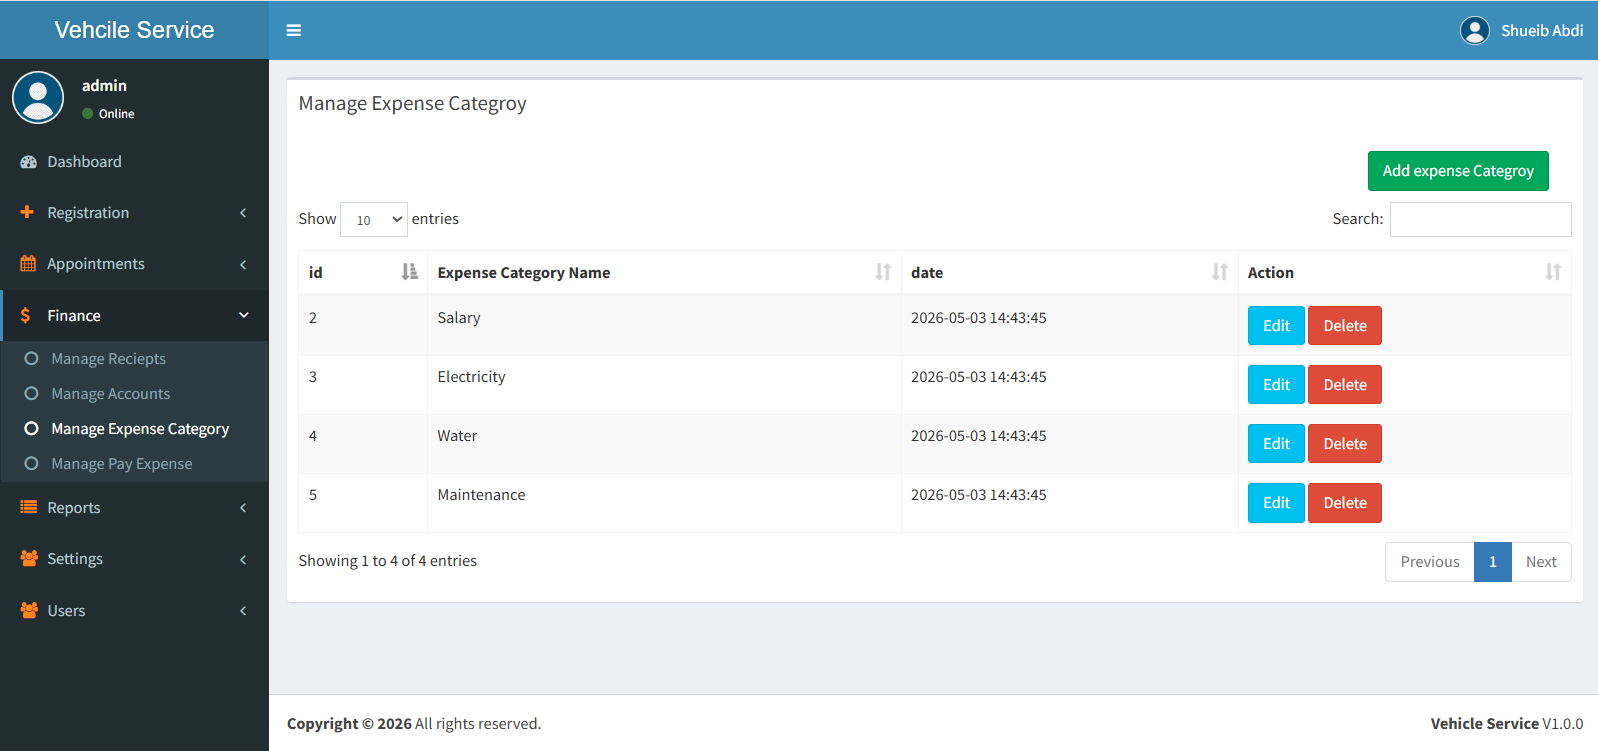
8. Manage Expense Categroy
This section allows you to define and manage expense categroy. These help you organize and track different types of expenses such as Fuel, Salary, Maintenance, and Utilities.
Add Expense Categroy
Path: Finance -> Manage Expense Categroy
To create a new expense categroy, click the "Add Expense Categroy" button. A modal window will appear where you need to enter:
- Expense Categroy Name: Enter the name (e.g., Fuel, Salary, Electricity, Maintenance).
Click Save to add the categroy to your system.
NB: How to Update & Delete
When you want to Update or Delete a categroy, you can do it directly from the Manage Expense Categroy table using the Action column:
Editing Categroy:
Clicking Edit will open a modal pre-filled with the current categroy name. After making changes, click Save Changes.
Deleting Categroy
Clicking Delete will show a confirmation alert:
Are you sure to delete?
Click OK to remove permanently,
or Cancel to keep the data.
9. Manage Pay Expense
This section allows you to record and manage all expenses paid from your accounts. It helps you track where your money is spent and maintain accurate financial records.
Pay New Expense
Path: Finance -> Manage Pay Expense
To record a new expense, click the "Pay New Expense" button. A modal window will appear with the following fields:
- Choose Expense Categroy: Select the expense categroy (e.g., Fuel, Salary, Maintenance).
- Amount: Enter the amount you are paying.
- Description: Add optional details about the expense.
- Choose Account: Select the account from which the money will be deducted (e.g., Cash, Bank, EVC Plus).
Click Save to complete the expense payment.
NB: How to Update & Delete
When you want to Update or Delete a record, you can do it directly from the Manage Pay Expense table using the Action column:
Editing Expense:
Clicking Edit will open a modal pre-filled with the current data. After making changes, click Save Changes.
Deleting Expense
Clicking Delete will show a confirmation alert:
Are you sure to delete?
Click OK to remove permanently,
or Cancel to keep the data.

10. Appointments Report
This section allows you to view and filter appointment records based on customer and appointment status. It is useful for tracking service activity and generating reports.
Search & Filter Appointments
Path: Reports -> Appointments
To filter appointment data, use the search form by selecting the following:
- Search Customer: Select a customer (e.g., Amina Yusuf).
- Appointment Status: Select status (e.g., Waiting, Completed, Cancelled).
Click the Search button to view results:
- If no filter is selected, all appointment records will be displayed.
- If filters are selected, only matching results will appear.
You can click Print to generate a printable report.
Important Note
This section is for viewing and reporting purposes only. No Update or Delete actions are available.

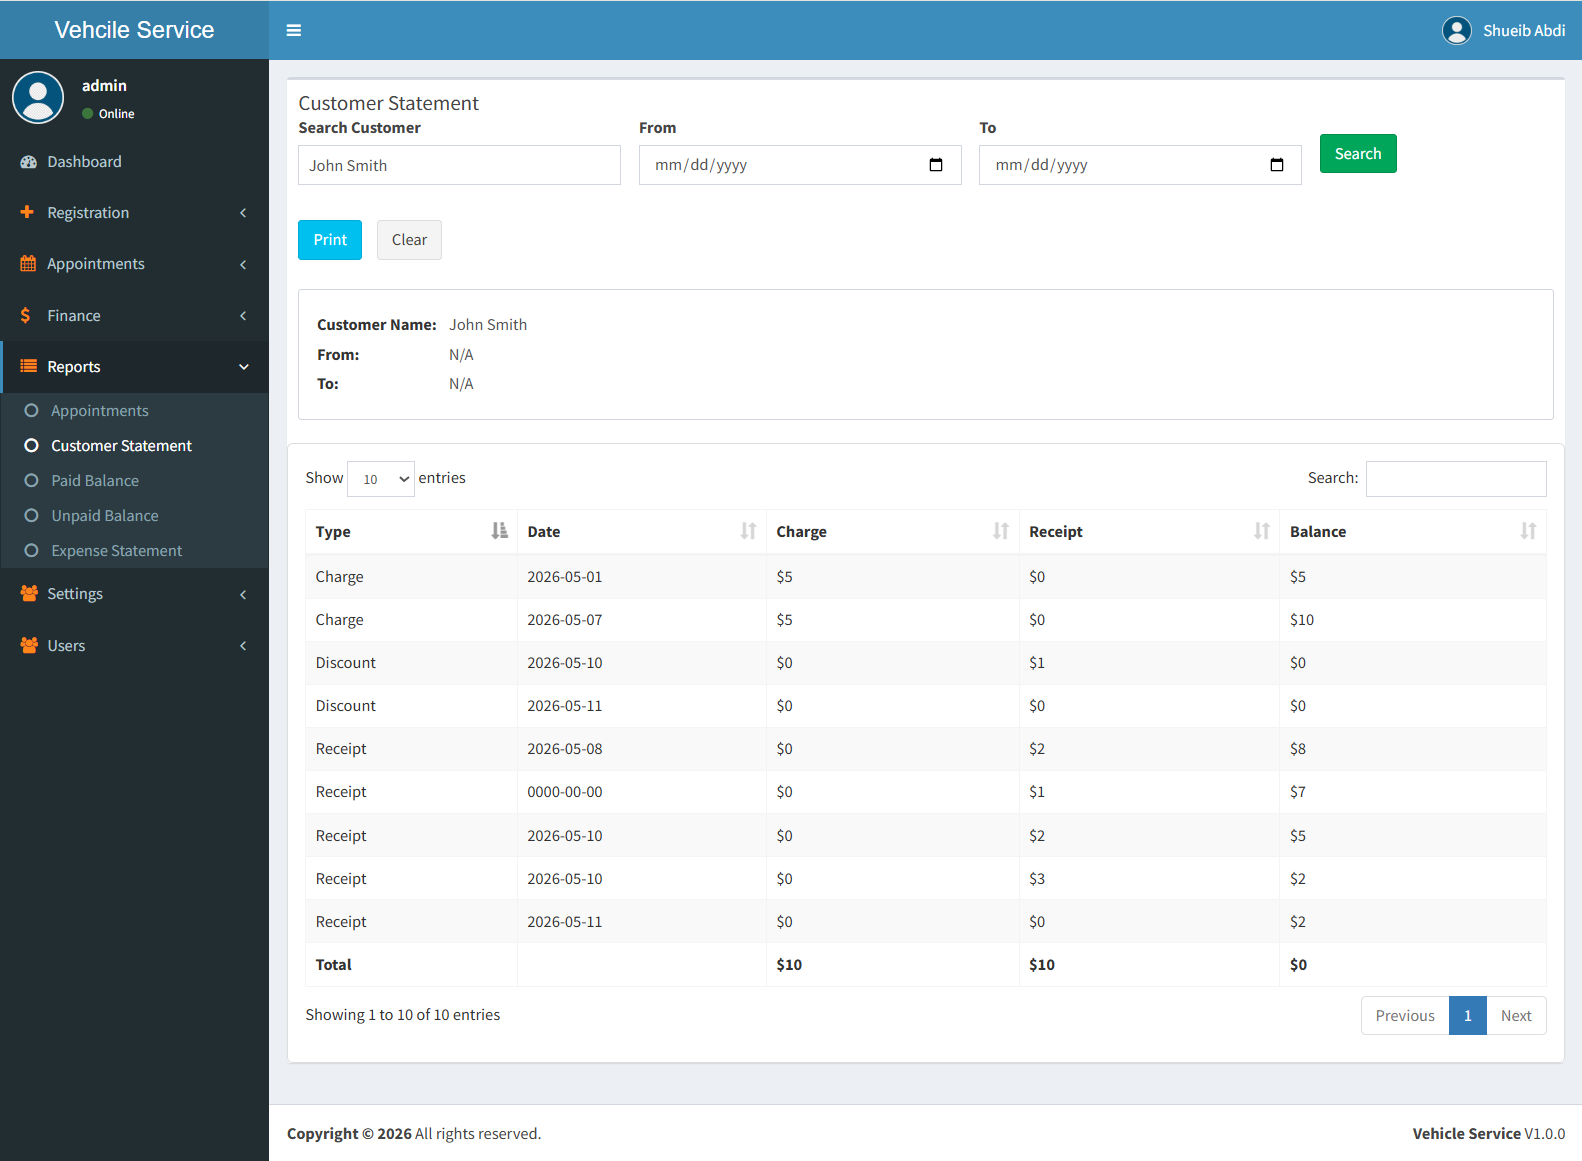
11. Customer Statement
This section allows you to view a detailed statement of a specific customer, including all transactions such as services, receipts, and balances.
Search Customer Statement
Path: Reports -> Customer Statement
To generate a customer statement, use the search form below:
- Search Customer: Search by Customer ID, Name, or Telephone. This field is required.
- From Date: Select the start date (optional).
- To Date: Select the end date (optional).
Click the Search button to view the statement:
- The selected customer must be chosen before searching.
- If no date is selected, all records for the customer will be displayed.
- If date range is selected, only transactions within that period will appear.
You can click Print to generate a printable customer statement.
Important Note
This section is for reporting purposes only. No Update or Delete actions are available.
12. Paid Balance
This section shows all paid balances from customers. It allows you to either view a specific customer's payments or display all records.
Search Paid Balance
Path: Reports -> Paid Balance
You can search paid balance in two ways:
- Search Customer (Optional): Search by Customer ID, Name, or Telephone. If selected, only that customer's paid balance will be shown.
- If no customer is selected, clicking Search will display all paid balance records.
Click Search to view results or Print to generate report.
Report Behavior
- If a customer is selected → shows only that customer's paid balance history.
- If no customer is selected → shows all paid balance records.
- No Update or Delete actions are available (read-only report).

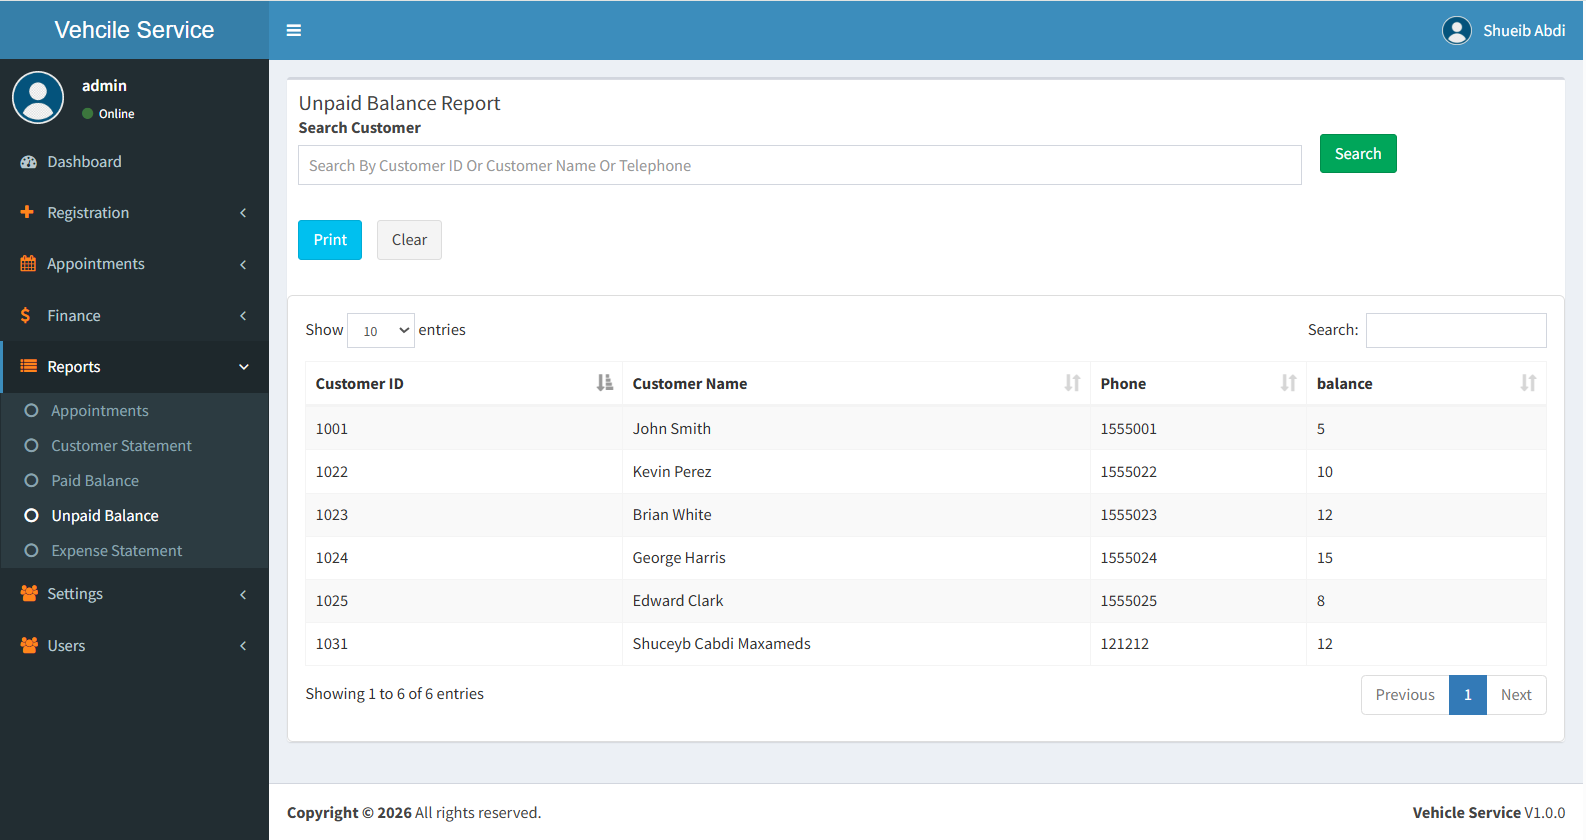
13. Unpaid Balance
This section shows all outstanding balances from customers. It helps you track customers who still owe payments.
Search Unpaid Balance
Path: Reports -> Unpaid Balance
You can view unpaid balance in two ways:
- Search Customer (Optional): Search by Customer ID, Name, or Telephone. If selected, only that customer's unpaid balance will be shown.
- If no customer is selected, clicking Search will display all unpaid balance records.
Click Search to view results or Print to generate report.
Report Behavior
- If a customer is selected → shows only that customer's unpaid balance.
- If no customer is selected → shows all unpaid balance records.
- This is a read-only report (no Update or Delete actions).
14. Expense Statement
This section allows you to view all expense records based on selected filters. It helps you analyze spending by category and expense categroy.
Search Expense Statement
Path: Reports -> Expense Statement
To generate an expense statement, use the filter options below:
- Select Expense Categroy: Choose the main expense categroy (e.g., Fuel, Salary, Maintenance).
- Select Category: Choose a specific category if available for more detailed filtering.
Click Search to view all matching expense records.
- If no filters are selected, all expense statements will be displayed.
- If filters are selected, only matching results will appear.
You can also click Print to generate a printable expense report.
Important Note
This is a read-only report section. No Update or Delete actions are available.

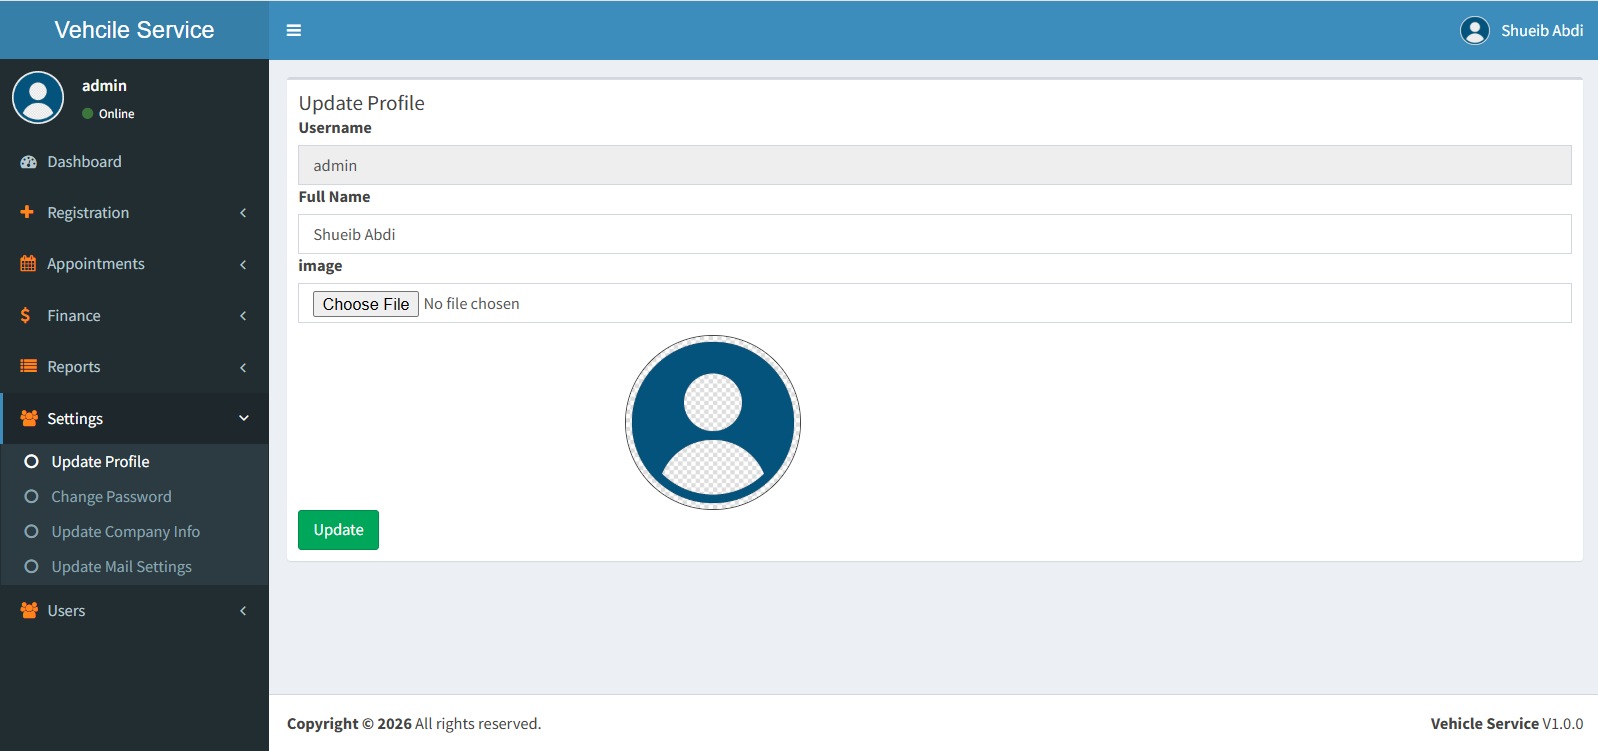
15. Update Profile
This section allows the user to update their personal profile information such as full name and profile image. It is located under Settings.
Update Profile
Path: Settings -> Update Profile
To update your profile, click the "Update Profile" button. A form will appear with the following fields:
- Username: This field is read-only and cannot be changed (e.g., shuceyb).
- Full Name: Enter or update your full name (e.g., Shuceyb Cabdi Maxamed).
- Image: Upload a new profile image if needed (No file chosen by default).
Click Update to save the changes.
Important Note
- Username cannot be changed (read-only field).
- Only Full Name and Image can be updated.
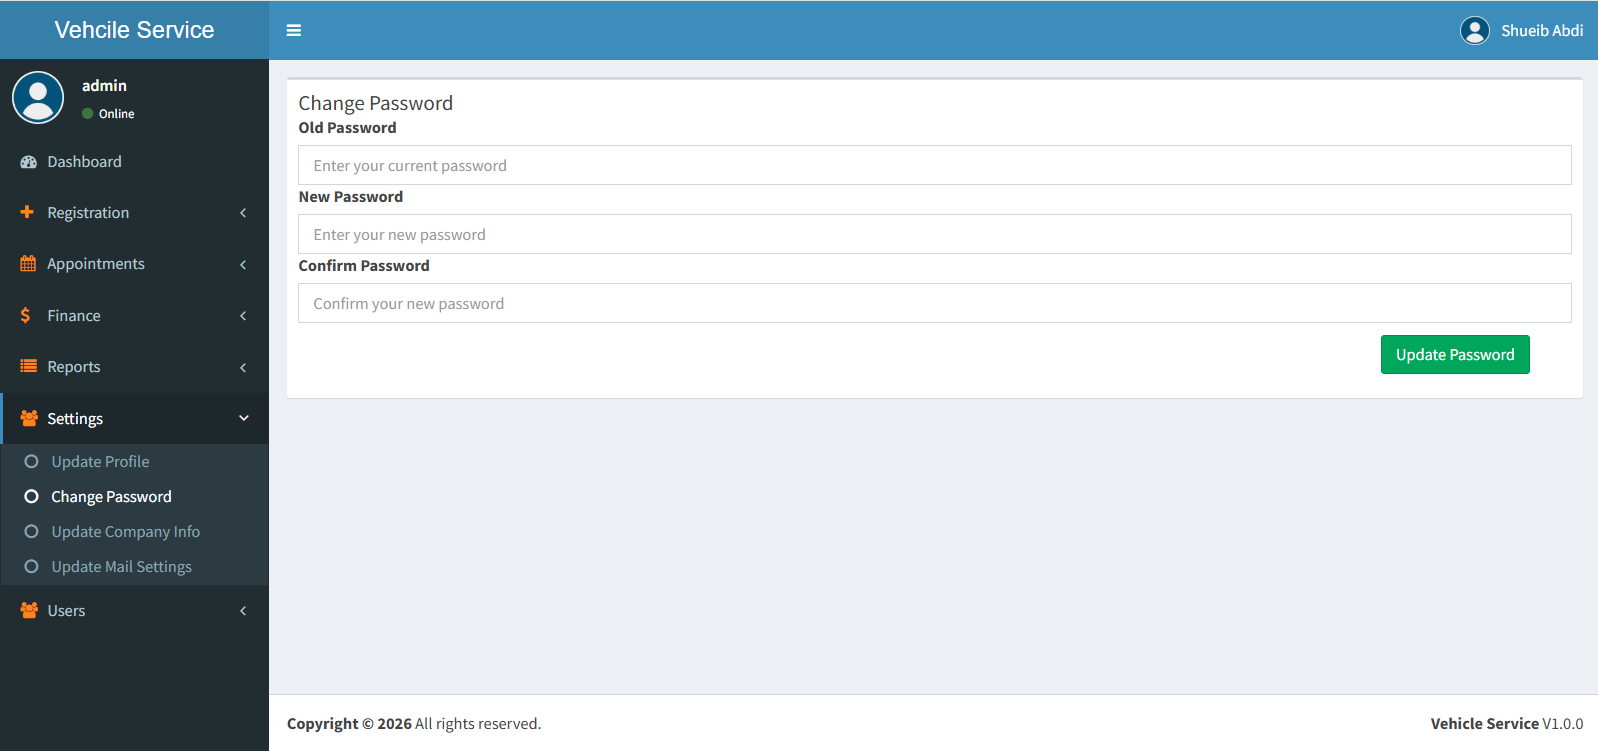
16. Change Password
This section allows the user to securely change their account password for better security and account protection.
Change Password
Path: Settings -> Change Password
To change your password, fill in the following fields:
- Old Password: Enter your current password for verification.
- New Password: Enter your new desired password.
- Confirm Password: Re-enter the new password to confirm it matches.
Click Change Password to save the new password.
Important Note
- Old password must be correct to proceed.
- New password and confirm password must match.
- Password change will take effect immediately after update.
17. Update Company Info
This section allows you to update the company information that appears across the system, including invoices, receipts, and reports.
Update Company Info
Path: Settings -> Update Company Info
To update company details, fill in the following fields:
- Company Name: Enter the name of the company (e.g., XYZ Vehicles Service).
- Tel: Enter the company phone number (e.g., 232).
- Address: Enter the company location (e.g., Xamar).
- Logo: Upload a new company logo (No file chosen by default).
Click Update to save the company information changes.
Important Note
- Company info is used in receipts, invoices, and reports.
- Logo update is optional but recommended for branding.
- Changes apply system-wide immediately after update.

18. Update Mail Settings (Email Setup)
This section allows the system to send password reset links to users via email. Users can request a reset link and securely update their password.
Email Configuration
Path: Settings → Update Mail Settings
- App Name: Name of your system (e.g., Vehicle Service System).
- SMTP User: Your email address (e.g., example@gmail.com).
- App Password: Email app password (NOT your normal password).
- forgetPassword: Enable/Disable Update Mail Settings email feature.
Click Update to save Update Mail Settings.
How Update Mail Settings Works
- User clicks " Update Mail Settings" on login page.
- User enters registered email address.
- System sends reset link to email.
- User clicks link and opens reset page.
- User enters new password.
- Password is updated successfully.

19. Manage Users
This section allows you to create and manage system users, assign login credentials, and upload profile images for each user.
Registering A New User
Path: Users -> Manage Users
To add a new system user, click the "Register New User" button. A modal window will appear where you need to enter the following details:
- Full Name: Enter the user's complete name.
- Username: Enter a unique username used for login.
- Email: Enter the user's email address.
- Password: Enter a secure password.
- Confirm Password: Re-enter the password to confirm.
- Registration Date: Select the registration date.
- Profile Image: Upload the user's profile picture.
- Image Preview: Displays a preview of the selected image.
Click Save to register the new user in the system.
NB: How to Update & Delete
When you want to Update or Delete a user, you can do it directly from the Manage Users table using the Action column:
Editing A User
Clicking Edit will open a modal pre-filled with the current user information. After making changes, click Save Changes to update the record.
Deleting A User
Clicking Delete will display a confirmation
alert:
Are you sure to delete?
Click OK to permanently remove the user,
or Cancel to keep the record.

Support
If any issues or product customization you can email us on shuceybcabdi69@gmail.com.